Wednesday, February 8, 2012

EASY Apple/Pear Crisp

This is a real quick recipe for a delicious dessert. It uses canned pears and apple pie filling so there's no peeling and slicing which makes it quicker than quick. I think I got this recipe originally from A Soft Place to Land several years ago.

Recipe:
4 15 oz. cans sliced pears, drained
1 20 oz. can apple pie filling
1 1/2 C. gluten-free oats
3/4 C. GF flour
3/4 C. brown sugar
3/4 t. ground cinnamon
3/4 C. butter (or we use Smart Balance Light since it's dairy-free), cut up

Preheat oven to 425 degrees.
Pour the pears and apple pie filling into a 9"x12" pan.
Mix the dry ingredients together, then mix in the butter using your fingers until it resembles coarse crumbs. Crumble the topping on top of the fruit.
Bake for 30-35 minutes until the fruit is hot and bubbly and the topping is crisp and browned.
Enjoy. With some vanilla ice cream if you've got it on hand.
I've made this in an 8x8 pan, too with half the fruit, but the same amount of topping, which I like better because then the topping is a bit thicker and covers it better. Have some for dessert, then eat the leftovers for breakfast, because really, it's just fruit and oatmeal. And sugar. :) Enjoy!!

Sunday, January 15, 2012

Pancakes

For a while, every time I wanted to make pancakes I would do a google search for gluten-free pancakes and pick a new pancake to try. Until last summer when my Grandpa's wife made us some pancakes using her regular recipe, just substituting rice flour in and they turned out just right. No xanthan gum or anything. So now I use my former whole-wheat pancake recipe as my new gluten-free pancake recipe.

Pancakes
1 ½ C. GF flour mix
2 T. sugar
2 T. baking powder
½ t. baking soda
1 t. salt
2 C. soy milk
1 egg (optional)

Mix it all together. I really don't measure the milk, or if I do, I usually end up adding more water after until it reaches the consistency I like.
These behave just like any other pancake: pour them out thin-ish, then wait until the bubbles on top have popped, flip and cook the other side, and enjoy.
I can't tell any difference between these and "real" pancakes.
Happy breakfasting!

Food storage-week 2

This week all I did was evaluate my long-term food storage, and make plans for what I need to get for that. I added two sheets to my spreadsheet. The first one has a list of all the stuff I have or need and how much I have and need. I included a list of non-food items I use regularly that I would like to have as part of my long-term storage, as well. Ideally I'll have a year supply of the long-term stuff, but realistically at this point I'm just working on getting what I think I might be able to accomplish this year. Baby steps to start.

The second sheet I added (the last sheet at this point) is a list of all the long-term items I need, and where I typically buy those items. My church runs canneries all over the country, including one here in my town, where you can go and work with others to pack up a bunch of long-term food storage, then buy it pretty much at cost, so I stick to that for anything that they have there. You can also order some pre-packaged stuff online if you want. For the other items, I get a lot at the grocery store or Sunflower Market. I also enjoy the fruit, especially, from Shelf Reliance (they have a GF list if you ask for it), and get some other items, including long-term gluten-free storage stuff from Augason Farms.

So the plan at this point is to spend either $10 or $20 each week (I haven't quite decided how much yet) on accumulating short-term storage items, and each month spend up to $100 on a few long-term items, rotating through the different places that I buy my long-term storage each month. If I have extra money in my grocery budget at the end of the month (according to my trusty mint.com budget tracker), that'll go for a few extra items as well. I'll probably base my short-term purchases on what is on sale that week, and if nothing is on sale that I need, I'll just go down the list.

Hopefully by the end of the year I'll have a healthy store of food we can all eat and enjoy. :)

Saturday, January 7, 2012

Food storage

One of my new year's goals (really my only one) is to get my food storage in order. I had my short-term food storage pretty well under control until Jake went dairy-free a few months ago, but never really had a good long-term plan in place. One of my friends shared her plan a while back and I decided that doing a similar format would help me. So my goal was to have a plan in place by the end of the first week, then each week I can add to my food storage, hopefully having it well under control by the end of the year. I'm almost there. I have my list of what I need short-term, which was a bigger under-taking than I thought. So I guess my goal for week 2 will be to get my long-term needs listed, and a weekly plan outlined.

If you're interested in some gluten-free food storage ideas, feel free to check out my spreadsheet and use it as you see fit. This is planning for 2 adults and 2 kids. The dinners are completely gluten-free, and able to be dairy-free (we just leave the cheese off until it's dished out then add it to the plates that are okay for dairy). Not all breakfast, lunches, and snacks are gluten-free because we go for quick and easy (and cheaper) when Jake's not around. These are all shelf-stable ingredients, or able to be frozen for longer-term storage, though not for over a year.

Probably a little explanation of each sheet is in order:
3 month meal plan: This sheet has all the meals and ingredients needed for each one. There are 18 meals, I think, which would mean you would need to rotate through the list about 3 1/2 times for a 3-month food storage, which is what I was going for. I multiplied the amounts by 4 to get a nice round number, so this plan is actually good for longer than 3 months.

ingredient amounts: This is where I compiled how much of each ingredient is needed. I also have random calculations and measurements off to the side, which may not make sense to people other than me, but the important part is the first 3 columns.

grocery list: I made a list of what I normally/occasionally get at the grocery store by aisle to make my grocery list making easier. I also put in parenthesis how many of the storage items I should have in my pantry. Useful for anyone who shops at the Rita Ranch Fry's but other than those few people, not much help to you.

Breakfast-lunch-snacks: This is basically my plan for the rest of the food besides dinners.

If you have questions or want any recipes that I haven't shared, let me know.

Thursday, December 29, 2011

Skillet enchiladas

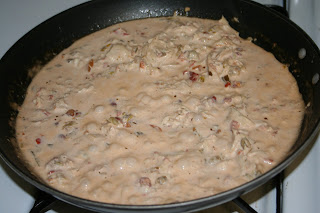
Tonight was one of those "the kids are starving now and I don't know what we're having for dinner" kind of nights. And I was supposed to go grocery shopping this morning, but didn't, so our choices were rather limited, so I improvised, and it turned out surprisingly tasty. It only took about 5 minutes which was a bonus. We are totally having this meal again.

I didn't measure anything, just scooped/poured until it looked good. 
Skillet Enchiladas
Canned chicken (large can)
mayonnaise-probably a cup-ish--several large spoonfuls
salsa
green chilies (small can)
cumin-a couple shakes sprinkled on
I just put everything in the skillet and let it simmer for a few minutes.
Serve on tortilla chips and enjoy!
Or add some cheese if you're not my husband (who is doing the dairy-free thing now), and enjoy!
Posted by Picasa

Wednesday, December 14, 2011

Caramels

If you're looking for more tasty candy recipes, here's another REALLY easy one. Just don't think about how much fat and sugar you're putting in. Or give away most of them, and the ones you eat get cancelled out by your generosity. :)
Caramels:
1 can Eagle Brand Sweetened Condensed Milk (use the can for measuring the other ingredients)
2 sticks of butter
1 can Karo syrup
1 can sugar
1 can brown sugar
Combine all ingredients in a saucepan that's big enough for the liquid to more than double when it's boiling and cook on high heat, stirring constantly until it reaches soft ball stage. That means stir for a long time. Pull out your favorite Christmas book to read while you stir. To test for soft ball stage, fill a cup about halfway with cold water and put a little of the caramel into the cup. When you can pull it out in a nice soft ball that is as soft or hard as you like your caramels, turn off the stove. Pour the mixture into an ungreased cake pan and let cool. Cut into pieces and wrap with wax paper. I've found that a pizza cutter can work pretty well.
One batch can make 150+ caramels. It goes a long way. Enjoy!
Posted by Picasa

Candied Pecans

'Tis the season to be baking. Fa la la la la, la la la la.

But as you will hear from many sources, if you're giving away food to non GF-ers, GF cookies or cake probably aren't the best options because the will taste "weird" to untrained taste buds. So stick with candy and other junk food that is naturally gluten-free. :)

This is the tastiest treat EVER! Candied pecans. And so easy to make.
Recipe:
2 lbs pecans
Whisk together 2 egg whites, 6 tsp (good) vanilla, 2 tsp water.
Put nuts in a BIG Ziploc and add the liquid, smoosh around. (Yes, that's the technical term)
Mix together in a bowl: 2 cups sugar, 4 tsp cinnamon, 2 tsp salt.
Dump this in the bag and smoosh around some more until they look coated. Put on a sheet cake pan and bake at 300 for an hour stirring every 15 minutes or so.
It will fill your home with a delicious aroma, and tastes just as good. I packaged them into little baggies to give to some friends and neighbors on goody plates along with some fudge and caramels.
Hope you enjoy them as much as my family does!!
Posted by Picasa